个人博客
http://www.milovetingting.cn
Android应用加固的简单实现方案 概述 Android应用加固的诸多方案中,其中一种就是基于dex的加固,本文介绍基于dex的加固方案。
原理:在AndroidManifest中指定启动Application为壳Module的Application,生成APK后,将壳Module的AAR文件和加密后的APK中的dex文件合并,然后重新打包签名。安装应用运行后,通过壳Module的Application来解密dex文件,然后再加载dex。
存在的问题:解密过程,会还原出来未加密的原dex文件,通过一些手段,还是可以获得未加密的dex。
实现 APK和壳AAR的生成 新建工程,然后新建一个Module,作为壳Module,名字随意,这里命名为shell。
在壳Module中新建继承自Application的ShellApplication,重写attachBaseContext方法,在这个方法加载原来的dex
1
2
3
4
5
6
7
8
9
10
11
12
13
14
15
16
17
18
19
20
21
22
23
24
25
26
27
28
29
30
31
32
33
34
35
36
37
38
39
40
41
42
43
44
45
46
47
48
49
50
51
52
53
54
55
56
57
public class ShellApplication extends Application { @Override protected void attachBaseContext (Context base) { super .attachBaseContext(base); try { File apkFile = new File (getApplicationInfo().sourceDir); File apkUnzipDir = getDir("apk" , Context.MODE_PRIVATE); apkUnzipDir = new File (apkUnzipDir, "unzip" ); if (!apkUnzipDir.exists()) { apkUnzipDir.mkdirs(); ZipUtils.unzipFile(apkFile, apkUnzipDir); File[] files = apkUnzipDir.listFiles(new FilenameFilter () { @Override public boolean accept (File dir, String name) { return name.endsWith(".dex" ); } }); File decryptDir = new File (apkUnzipDir, "decrypt" ); decryptDir.mkdirs(); ArrayList<File> list = new ArrayList <>(); for (File file : files) { if (file.getName().endsWith("classes.dex" )) { list.add(file); } else { File decryptFile = new File (decryptDir, file.getName()); EncryptUtils.decrypt(file.getAbsolutePath(), decryptFile.getAbsolutePath()); list.add(decryptFile); file.delete(); } } ClassLoaderUtil.loadDex(this , list); } else { ArrayList<File> list = new ArrayList <>(); list.add(new File (apkUnzipDir, "classes.dex" )); File decryptDir = new File (apkUnzipDir, "decrypt" ); File[] files = decryptDir.listFiles(); for (File file : files) { list.add(file); } ClassLoaderUtil.loadDex(this , list); } } catch (Exception e) { e.printStackTrace(); } } }
修改app的AndroidManifest中application节点的name为壳Module的Application
1 2 3 4 5 6 7 8 9 10 11 12 13 14 15 16 <application android:name ="com.wangyz.shell.ShellApplication" android:allowBackup ="true" android:icon ="@mipmap/ic_launcher" android:label ="@string/app_name" android:roundIcon ="@mipmap/ic_launcher_round" android:supportsRtl ="true" android:theme ="@style/AppTheme" > <activity android:name =".MainActivity" > <intent-filter > <action android:name ="android.intent.action.MAIN" /> <category android:name ="android.intent.category.LAUNCHER" /> </intent-filter > </activity > </application >
在Gradle面板,双击app/Tasks/build/目录下的assembleRelease,生成未签名的APK
在app/build/outputs/apk/release/目录下,可以找到生成的apk:app-release-unsigned.apk
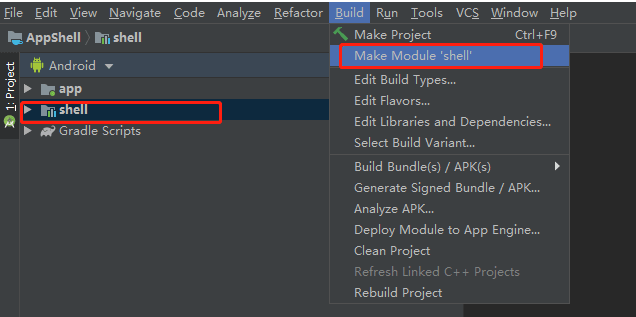
在Android Studio中,点击Build-Make Module ‘shell’,生成AAR。
在shell/build/outputs/aar/目录下,可以找到生成的aar:shell-debug.aar
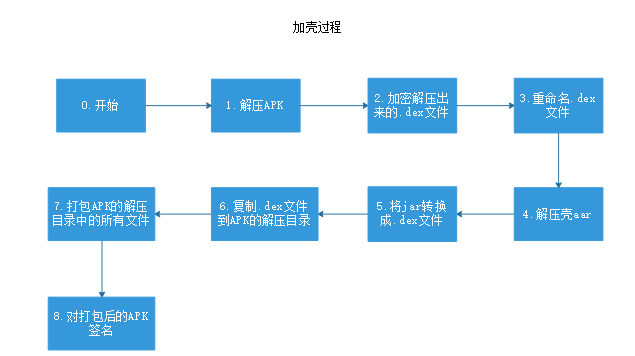
加壳的过程 加壳的实现流程如下:
这里选择Eclipse新建Java工程来操作。
项目结构说明:
input:存放需要加壳的apk和aar
keystore:存放签名用到的keystore文件
output:打包后输出目录,signed为签名后的apk
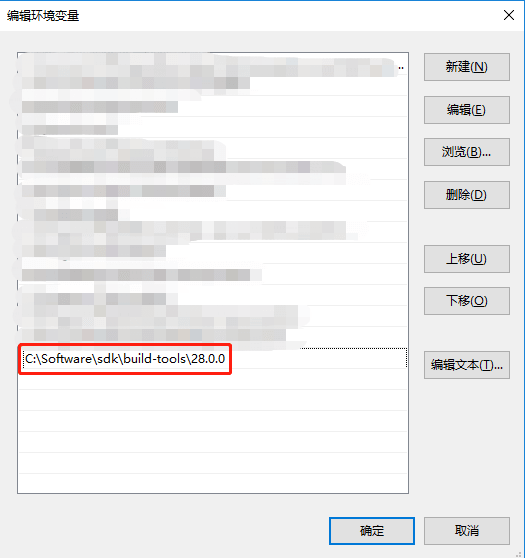
需要配置的环境变量:
由于要用到dx来将jar转换成dex,因此需要配置dx的路径。在SDK/build-tools/下,有对应不同版本的build工具,这里选择28.0.0,进入28.0.0文件夹,可以看到dx.bat文件。在电脑的环境变量中,修改path,增加dx.bat路径:
由于要用到jarsigner来签名apk,因此需要配置jarsigner的环境变量。一般Java开发的话,JDK配置好了后,这个就不需要再配置了。
配置好上面的环境变量后,关掉eclipse,然后重新启动eclipse
Main类中的代码逻辑:
1
2
3
4
5
6
7
8
9
10
11
12
13
14
15
16
17
18
19
20
21
22
23
24
25
26
27
28
29
30
31
32
33
34
35
36
37
38
39
40
41
42
43
44
45
46
47
48
49
50
51
52
53
54
55
56
57
58
59
60
61
62
63
64
65
66
67
68
69
70
71
72
73
74
75
76
77
78
79
80
81
82
83
84
85
86
try { File apkFile = new File ("input/app-debug.apk" ); File shellFile = new File ("input/shell-debug.aar" ); if (!apkFile.exists() || !shellFile.exists()) { System.out.println("apkFile or shellFile missing" ); return ; } System.out.println("解压APK" ); File outputDir = new File ("output/" ); if (outputDir.exists()) { FileUtils.deleteAllInDir(outputDir); } File apkUnzipDir = new File ("output/unzip/apk/" ); if (!apkUnzipDir.exists()) { apkUnzipDir.mkdirs(); } ZipUtil.unZip(apkFile, apkUnzipDir); File certRSA = new File (apkUnzipDir, "/META-INF/CERT.RSA" ); certRSA.delete(); File certSF = new File (apkUnzipDir, "/META-INF/CERT.SF" ); certSF.delete(); File manifestMF = new File (apkUnzipDir, "/META-INF/MANIFEST.MF" ); manifestMF.delete(); File[] apkFiles = apkUnzipDir.listFiles(new FilenameFilter () { @Override public boolean accept (File file, String s) { return s.endsWith(".dex" ); } }); for (int i = apkFiles.length - 1 ; i >= 0 ; i--) { File file = apkFiles[i]; String name = file.getName(); System.out.println("dex:" + name); String bakName = name.substring(0 , name.indexOf(".dex" )) + "_bak.dex" ; System.out.println("备份dex:" + bakName); bakName = file.getParent() + File.separator + name.substring(0 , name.indexOf(".dex" )) + "_bak.dex" ; EncryptUtils.encrypt(file.getAbsolutePath(), bakName); System.out.println("加密dex:" + name); file.delete(); } System.out.println("解压壳AAR" ); File shellUnzipDir = new File ("output/unzip/shell/" ); if (!shellUnzipDir.exists()) { shellUnzipDir.mkdirs(); } ZipUtil.unZip(shellFile, shellUnzipDir); System.out.println("将jar转成dex" ); File shellJar = new File (shellUnzipDir, "classes.jar" ); File shellDex = new File (apkUnzipDir, "classes.dex" ); DexUtils.dxCommand(shellJar, shellDex); System.out.println("打包APK" ); File unsignedApk = new File ("output/unsigned.apk" ); ZipUtil.zip(apkUnzipDir, unsignedApk); FileUtils.delete("output/unzip/" ); System.out.println("签名APK" ); File signedApk = new File ("output/signed.apk" ); SignUtils.signature(unsignedApk, signedApk, "keystore/android.keystore" ); System.out.println("Finished!!!" ); } catch (Exception e) { e.printStackTrace(); }
来看下具体的步骤:
解压APK 1 2 3 4 5 6 File apkUnzipDir = new File (root, "/output/unzip/apk/" );if (!apkUnzipDir.exists()) { apkUnzipDir.mkdirs(); } ZipUtil.unZip(apkFile, apkUnzipDir);
加密解压出来的dex文件、重命名dex文件 1 2 3 4 5 6 7 8 9 10 11 12 13 14 15 16 File[] apkFiles = apkUnzipDir.listFiles((file, s) -> s.endsWith(".dex" )); for (int i = apkFiles.length - 1 ; i >= 0 ; i--) { File file = apkFiles[i]; String name = file.getName(); System.out.println("dex:" + name); String bakName = name.substring(0 , name.indexOf(".dex" )) + "_bak.dex" ; System.out.println("备份dex:" + bakName); bakName = file.getParent() + File.separator + name.substring(0 , name.indexOf(".dex" )) + "_bak.dex" ; EncryptUtils.encrypt(file.getAbsolutePath(), bakName); System.out.println("加密dex:" + name); file.delete(); }
解压壳AAR 1 2 3 4 5 6 File shellUnzipDir = new File (root, "/output/unzip/shell/" );if (!shellUnzipDir.exists()) { shellUnzipDir.mkdirs(); } ZipUtil.unZip(shellFile, shellUnzipDir);
将jar转成dex 1 2 3 File shellJar = new File (shellUnzipDir, "classes.jar" );File shellDex = new File (apkUnzipDir, "classes.dex" );DexUtils.dxCommand(shellJar, shellDex);
打包 1 2 File unsignedApk = new File (root, "/output/unsigned.apk" );ZipUtil.zip(apkUnzipDir, unsignedApk);
签名 1 2 3 4 5 FileUtils.delete(new File (root, "output/unzip/" )); System.out.println("签名APK" ); File signedApk = new File (root, "output/signed.apk" );SignUtils.signature(unsignedApk, signedApk, keystore, keyStorePassword, keyPassword, alias); System.out.println("Finished!!!" );
在output目录下,可以看到已经生成signed.apk。将apk安装在手机上,可以正常运行,达到加固的目的。
源码 源码地址:https://github.com/milovetingting/Samples/tree/master/Shell/%E5%8A%A0%E5%9B%BA-%E6%89%8B%E5%8A%A8%E5%8A%A0%E5%A3%B3
基于gradle的自动加固 上面的加固方式,需要在生成APK后,再生成壳Module的AAR文件,然后再通过工具来生成加固的APK。这个过程,手动操作还是比较麻烦的。可以借助gradle来生成插件,在生成APK后,自动完成加固。
插件生成 新建工程Plugins,新建module,名为shell,作为加壳的插件。
清空shell模块下的build文件内容修改如下:
1 2 3 4 5 6 apply plugin: 'groovy' dependencies { implementation gradleApi() implementation localGroovy() }
删除shell模块下的src/main/目录下的所有文件,然后新建目录groovy,在groovy中再新建包:com/wangyz/plugins,具体可以根据实际情况修改。
新建ShellConfig.java,作为自定义配置的bean
1 2 3 4 5 6 7 8 9 10 11 12 13 14 15 16 17 18 19 20 21 22 23 24 25 26 27 28 public class ShellConfig { String shellModuleName; String keyStore; String keyStorePassword; String keyPassword; String alias; }
新建ShellPlugin.groovy,主要的逻辑都在这里面
1 2 3 4 5 6 7 8 9 10 11 12 13 14 15 16 17 18 19 20 21 22 23 24 25 26 27 28 29 30 31 32 33 34 35 36 37 38 39 40 41 42 43 44 45 46 47 48 49 50 51 52 53 54 55 56 57 58 59 60 61 62 63 64 65 66 67 68 69 70 71 72 73 74 75 76 77 78 79 80 81 82 83 84 85 86 87 88 89 90 91 92 93 94 95 96 97 98 99 100 101 102 103 104 105 106 107 package com.wangyz.pluginsimport com.wangyz.plugins.util.ShellUtilimport org.gradle.api.Pluginimport org.gradle.api.Projectclass ShellPlugin implements Plugin <Project> { def printLog(Object msg) { println("******************************" ) println(msg) println("******************************\n" ) } def createDir(Project project) { File shellDir = new File("${project.rootDir}/ShellAPK" ) if (!shellDir.exists()) { printLog("create dir" ) shellDir.mkdirs() } } def deleteDir(Project project) { File shellDir = new File("${project.rootDir}/ShellAPK" ) if (shellDir.exists()) { printLog("delete dir" ) shellDir.deleteDir() } } @Override void apply(Project project) { printLog('ShellPlugin apply' ) project.extensions.create("shellConfig" , ShellConfig) project.afterEvaluate { project.tasks.matching { it.name == 'assembleRelease' }.each { task -> printLog(task.name) def shellProject = project.parent.findProject("${project.shellConfig.shellModuleName}" ) printLog("shellProject:$shellProject" ) File shellDir = new File("${project.rootDir}/ShellAPK" ) File apkFile File aarFile = new File("${shellProject.buildDir}/outputs/aar/shell-release.aar" ) project.android.applicationVariants.all { variant -> variant.outputs.each { output -> def outputFile = output.outputFile printLog("outputFile:${outputFile.getAbsolutePath()}" ) if (outputFile.name.contains("release" )) { apkFile = outputFile } } } task.doFirst { deleteDir(project) createDir(project) printLog("begin generate aar" ) project.exec { workingDir("../${project.shellConfig.shellModuleName}/" ) commandLine('cmd' , '/c' , 'gradle' , 'assembleRelease' ) } printLog("generate aar complete" ) printLog("begin copy aar" ) project.copy { from aarFile into shellDir } printLog("copy aar complete" ) } task.doLast { printLog("begin copy apk" ) project.copy { from apkFile into shellDir } printLog("copy ${apkFile.name} complete" ) printLog("begin shell" ) ShellUtil.shell(apkFile.getAbsolutePath(), aarFile.getAbsolutePath(), shellDir.getAbsolutePath(), project.shellConfig.keyStore, project.shellConfig.keyStorePassword, project.shellConfig.keyPassword, project.shellConfig.alias) printLog("end shell" ) } } } } }
ShellPlugin类实现Plugin接口,实现apply方法,当插件被apply时,就会回调这个方法。
首先创建配置,这样引用插件的gradle文件就可以定义shellConfig节点,插件就可以拿到配置节点里的内容
1 project.extensions.create("shellConfig" , ShellConfig)
指定在assembleRelease后执行我们自己的逻辑
1 2 3 4 5 6 7 8 project.afterEvaluate { project.tasks.matching { it.name == 'assembleRelease' }.each { task -> printLog(task.name) } }
具体的逻辑定义在task的闭包中,在生成apk前,执行task.doFirst里的逻辑,首先生成aar,然后执行生成apk的逻辑,然后在task.doLast中执行加壳的操作。
1 2 3 4 5 6 7 8 9 10 11 12 13 14 15 16 17 18 19 20 21 22 23 24 25 26 27 28 29 30 31 32 33 34 35 36 37 38 39 40 41 42 43 44 45 46 47 48 49 50 51 52 53 54 55 56 57 58 59 60 printLog(task.name) def shellProject = project.parent.findProject("${project.shellConfig.shellModuleName}" ) printLog("shellProject:$shellProject" ) File shellDir = new File("${project.rootDir}/ShellAPK" ) File apkFile File aarFile = new File("${shellProject.buildDir}/outputs/aar/shell-release.aar" ) project.android.applicationVariants.all { variant -> variant.outputs.each { output -> def outputFile = output.outputFile printLog("outputFile:${outputFile.getAbsolutePath()}" ) if (outputFile.name.contains("release" )) { apkFile = outputFile } } } task.doFirst { deleteDir(project) createDir(project) printLog("begin generate aar" ) project.exec { workingDir("../${project.shellConfig.shellModuleName}/" ) commandLine('cmd' , '/c' , 'gradle' , 'assembleRelease' ) } printLog("generate aar complete" ) printLog("begin copy aar" ) project.copy { from aarFile into shellDir } printLog("copy aar complete" ) } task.doLast { printLog("begin copy apk" ) project.copy { from apkFile into shellDir } printLog("copy ${apkFile.name} complete" ) printLog("begin shell" ) ShellUtil.shell(apkFile.getAbsolutePath(), aarFile.getAbsolutePath(), shellDir.getAbsolutePath(), project.shellConfig.keyStore, project.shellConfig.keyStorePassword, project.shellConfig.keyPassword, project.shellConfig.alias) printLog("end shell" ) }
在src/main/目录下新建目录:resources/META-INF/gradle-plugins,再创建com.wangyz.plugins.ShellPlugin.properties的文件,这里的文件名就是后面插件被引用时的名字,com.wangyz.plugins.ShellPlugin.properties内容如下:
1 implementation-class=com.wangyz.plugins.ShellPlugin
key为implementation-class,这个是固定的
value为com.wangyz.plugins.ShellPlugin,就是上面在groovy里创建的类
到这里,定义好了插件,还需要发布到仓库。在shell模块的build.gradle文件中增加以下配置
1 2 3 4 5 6 7 8 9 10 11 12 13 14 15 16 17 18 19 20 21 apply plugin: 'maven-publish' publishing { publications { mavenJava(MavenPublication) { groupId 'com.wangyz.plugins' artifactId 'ShellPlugin' version '1.0.0' from components.java } } } publishing { repositories { maven { url uri('E:\\Repository') } } }
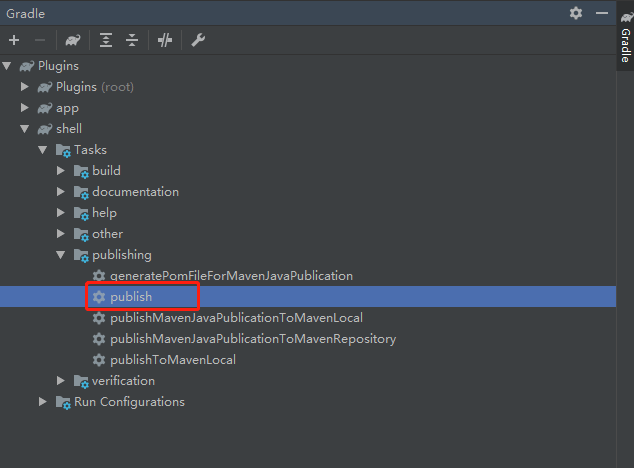
sync项目后,可以在Gradle面板看到新生成的task
双击publish,会将插件发布到我们指定的仓库
1 2 3 4 5 6 7 8 9 10 11 12 13 14 15 16 17 18 19 11:22:39: Executing task 'publish'... Executing tasks: [publish] in project D:\Project\Plugins\shell Parallel execution with configuration on demand is an incubating feature. :shell:generatePomFileForMavenJavaPublication :shell:compileJava NO-SOURCE :shell:compileGroovy UP-TO-DATE :shell:processResources UP-TO-DATE :shell:classes UP-TO-DATE :shell:jar UP-TO-DATE Could not find metadata com.wangyz.plugins:ShellPlugin/maven-metadata.xml in remote (file:/E:/Repository) :shell:publishMavenJavaPublicationToMavenRepository :shell:publish BUILD SUCCESSFUL in 0s 5 actionable tasks: 2 executed, 3 up-to-date 11:22:40: Task execution finished 'publish'.
插件应用 在需要加壳的工程的根build.gradle中引入插件:
1 2 3 4 5 6 7 8 9 10 11 12 13 14 15 16 17 18 19 buildscript { repositories { maven { url uri('E:\\Repository' ) } } dependencies { classpath 'com.wangyz.plugins:ShellPlugin:1.0.0' } } allprojects { repositories { maven { url uri('E:\\Repository' ) } } }
在app的build.gradle中应用插件:
1 2 3 4 5 6 7 8 9 10 11 apply plugin: 'com.wangyz.plugins.ShellPlugin' shellConfig { shellModuleName = 'shell' keyStore = 'E:\\Code\\Android\\android.keystore' keyStorePassword = 'android' keyPassword = 'android' alias = 'android' }
由于插件中会用到gradle命令,因此需要先配置gradle的路径到环境变量path中。具体配置,可以找下相关资料,这里不再展开。
双击执行assembleRelease命令,就会在根目录/ShellApk/output/下生成加壳签名后的apk。
安装加壳签名后的apk,可以正常运行。
源码 源码地址:https://github.com/milovetingting/Samples/tree/master/Shell/%E5%8A%A0%E5%9B%BA-gradle%E6%8F%92%E4%BB%B6%E5%8A%A0%E5%A3%B3
插件的实现 上面的方案,实际操作起来还是比较麻烦。因此,可以定义一个插件,通过引入这个插件,来实现apk的加固,减少编码的工作量。
可以参考下一篇文章:Android应用加固的简单实现方案(二)