个人博客
http://www.milovetingting.cn
四大组件的工作过程
四大组件:Activity、Service、BroadcastReceiver、ContentProvider
四大组件的运行状态 Android的四大组件中除了BroadcastReceiver,其它三种组件必须在AndroidManifest中注册。对于BroadcastReceiver,既可以在AndroidManifest中注册,也可以通过代码注册。调用方式上,Activity、Service和BroadcastReceiver都需要借助Intent,而ContentProvider则不需要。
Activity是一种展示型组件。Activity的启动由Intent触发,Intent可以分为显示Intent和隐式Intent。
Service是一种计算型组件,它有两种状态:启动状态和绑定状态。Service虽然是运行在后台,但它本身是运行在主线程中。
BroadcastReceiver是一种消息型组件。它的注册有两种:静态注册和动态注册。
ContentProvider是一种数据共享型组件。它的内部需要实现增删改查这四种操作。这四个方法需要处理好线程同步。
Activity的工作过程 从Activity的startActivity方法开始分析,startActivity方法有几个重载,但最终都会调用startActivityForResult方法
1
2
3
4
5
6
7
8
9
10
11
12
13
public void startActivity (Intent intent) { this .startActivity(intent, null ); } public void startActivity (Intent intent, @Nullable Bundle options) { if (options != null ) { startActivityForResult(intent, -1 , options); } else { startActivityForResult(intent, -1 ); } }
startActivityForResult方法实现如下:
1
2
3
4
5
6
7
8
9
10
11
12
13
14
15
16
17
18
19
20
21
22
23
24
25
26
27
28
29
30
31
32
33
34
35
36
public void startActivityForResult (@RequiresPermission Intent intent, int requestCode, @Nullable Bundle options) { if (mParent == null ) { options = transferSpringboardActivityOptions(options); Instrumentation.ActivityResult ar = mInstrumentation.execStartActivity( this , mMainThread.getApplicationThread(), mToken, this , intent, requestCode, options); if (ar != null ) { mMainThread.sendActivityResult( mToken, mEmbeddedID, requestCode, ar.getResultCode(), ar.getResultData()); } if (requestCode >= 0 ) { mStartedActivity = true ; } cancelInputsAndStartExitTransition(options); } else { if (options != null ) { mParent.startActivityFromChild(this , intent, requestCode, options); } else { mParent.startActivityFromChild(this , intent, requestCode); } } }
在mParent == null的分支里,会调用Instrumentation的execStartActivity方法
1
2
3
4
5
6
7
8
9
10
11
12
13
14
15
16
17
18
19
public ActivityResult execStartActivity ( Context who, IBinder contextThread, IBinder token, Activity target, Intent intent, int requestCode, Bundle options) { IApplicationThread whoThread = (IApplicationThread) contextThread; try { intent.migrateExtraStreamToClipData(); intent.prepareToLeaveProcess(who); int result = ActivityManager.getService() .startActivity(whoThread, who.getBasePackageName(), intent, intent.resolveTypeIfNeeded(who.getContentResolver()), token, target != null ? target.mEmbeddedID : null , requestCode, 0 , null , options); checkStartActivityResult(result, intent); } catch (RemoteException e) { throw new RuntimeException ("Failure from system" , e); } return null ; }
可以看到,ActivityManager.getService()是一个单例,返回的是一个Binder对象。
1
2
3
4
5
6
7
8
9
10
11
12
13
public static IActivityManager getService () { return IActivityManagerSingleton.get(); } private static final Singleton<IActivityManager> IActivityManagerSingleton = new Singleton <IActivityManager>() { @Override protected IActivityManager create () { final IBinder b = ServiceManager.getService(Context.ACTIVITY_SERVICE); final IActivityManager am = IActivityManager.Stub.asInterface(b); return am; } };
最终启动Activity是由ActivityManagerService的startActivity方法实现。
1
2
3
4
5
6
7
8
9
10
11
12
13
14
15
16
17
18
19
public final int startActivity (IApplicationThread caller, String callingPackage, Intent intent, String resolvedType, IBinder resultTo, String resultWho, int requestCode, int startFlags, ProfilerInfo profilerInfo, Bundle bOptions) { return startActivityAsUser(caller, callingPackage, intent, resolvedType, resultTo, resultWho, requestCode, startFlags, profilerInfo, bOptions, UserHandle.getCallingUserId()); } public final int startActivityAsUser (IApplicationThread caller, String callingPackage, Intent intent, String resolvedType, IBinder resultTo, String resultWho, int requestCode, int startFlags, ProfilerInfo profilerInfo, Bundle bOptions, int userId) { enforceNotIsolatedCaller("startActivity" ); userId = mUserController.handleIncomingUser(Binder.getCallingPid(), Binder.getCallingUid(), userId, false , ALLOW_FULL_ONLY, "startActivity" , null ); return mActivityStarter.startActivityMayWait(caller, -1 , callingPackage, intent, resolvedType, null , null , resultTo, resultWho, requestCode, startFlags, profilerInfo, null , null , bOptions, false , userId, null , "startActivityAsUser" ); }
Activity的启动转移到了ActivityStarter的startActivityMayWait方法里
1
2
3
4
5
6
7
8
9
10
11
12
13
14
15
16
17
18
final int startActivityMayWait (IApplicationThread caller, int callingUid, String callingPackage, Intent intent, String resolvedType, IVoiceInteractionSession voiceSession, IVoiceInteractor voiceInteractor, IBinder resultTo, String resultWho, int requestCode, int startFlags, ProfilerInfo profilerInfo, WaitResult outResult, Configuration globalConfig, Bundle bOptions, boolean ignoreTargetSecurity, int userId, TaskRecord inTask, String reason) { final ActivityRecord[] outRecord = new ActivityRecord [1 ]; int res = startActivityLocked(caller, intent, ephemeralIntent, resolvedType, aInfo, rInfo, voiceSession, voiceInteractor, resultTo, resultWho, requestCode, callingPid, callingUid, callingPackage, realCallingPid, realCallingUid, startFlags, options, ignoreTargetSecurity, componentSpecified, outRecord, inTask, reason); } }
startActivityMayWait方法会调用startActivityLocked方法
1
2
3
4
5
6
7
8
9
10
11
12
13
14
15
16
int startActivityLocked (IApplicationThread caller, Intent intent, Intent ephemeralIntent, String resolvedType, ActivityInfo aInfo, ResolveInfo rInfo, IVoiceInteractionSession voiceSession, IVoiceInteractor voiceInteractor, IBinder resultTo, String resultWho, int requestCode, int callingPid, int callingUid, String callingPackage, int realCallingPid, int realCallingUid, int startFlags, ActivityOptions options, boolean ignoreTargetSecurity, boolean componentSpecified, ActivityRecord[] outActivity, TaskRecord inTask, String reason) { mLastStartActivityResult = startActivity(caller, intent, ephemeralIntent, resolvedType, aInfo, rInfo, voiceSession, voiceInteractor, resultTo, resultWho, requestCode, callingPid, callingUid, callingPackage, realCallingPid, realCallingUid, startFlags, options, ignoreTargetSecurity, componentSpecified, mLastStartActivityRecord, inTask); }
在startActivityLocked方法里调用了startActivity方法,startActivity方法内又调用doPendingActivityLaunchesLocked方法
1
2
3
4
5
6
7
8
9
10
11
12
13
14
15
16
17
18
19
20
21
22
23
24
25
26
27
28
29
30
31
32
33
34
35
36
37
38
39
final void doPendingActivityLaunchesLocked (boolean doResume) { while (!mPendingActivityLaunches.isEmpty()) { final PendingActivityLaunch pal = mPendingActivityLaunches.remove(0 ); final boolean resume = doResume && mPendingActivityLaunches.isEmpty(); try { startActivity(pal.r, pal.sourceRecord, null , null , pal.startFlags, resume, null , null , null ); } catch (Exception e) { Slog.e(TAG, "Exception during pending activity launch pal=" + pal, e); pal.sendErrorResult(e.getMessage()); } } } private int startActivity (final ActivityRecord r, ActivityRecord sourceRecord, IVoiceInteractionSession voiceSession, IVoiceInteractor voiceInteractor, int startFlags, boolean doResume, ActivityOptions options, TaskRecord inTask, ActivityRecord[] outActivity) { int result = START_CANCELED; try { mService.mWindowManager.deferSurfaceLayout(); result = startActivityUnchecked(r, sourceRecord, voiceSession, voiceInteractor, startFlags, doResume, options, inTask, outActivity); } finally { if (!ActivityManager.isStartResultSuccessful(result) && mStartActivity.getTask() != null ) { mStartActivity.getTask().removeActivity(mStartActivity); } mService.mWindowManager.continueSurfaceLayout(); } postStartActivityProcessing(r, result, mSupervisor.getLastStack().mStackId, mSourceRecord, mTargetStack); return result; }
startActivity调用startActivityUnchecked方法
1
2
3
4
5
6
7
8
9
10
11
12
13
14
15
16
private int startActivityUnchecked (final ActivityRecord r, ActivityRecord sourceRecord, IVoiceInteractionSession voiceSession, IVoiceInteractor voiceInteractor, int startFlags, boolean doResume, ActivityOptions options, TaskRecord inTask, ActivityRecord[] outActivity) { if (dontStart) { topStack.mLastPausedActivity = null ; if (mDoResume) { mSupervisor.resumeFocusedStackTopActivityLocked(); } } }
startActivityUnchecked调用ActivityStackSupervisor中的resumeFocusedStackTopActivityLocked方法
1
2
3
4
5
6
7
8
9
10
11
12
13
14
15
16
17
18
19
20
21
22
23
24
25
boolean resumeFocusedStackTopActivityLocked () { return resumeFocusedStackTopActivityLocked(null , null , null ); } boolean resumeFocusedStackTopActivityLocked ( ActivityStack targetStack, ActivityRecord target, ActivityOptions targetOptions) { if (!readyToResume()) { return false ; } if (targetStack != null && isFocusedStack(targetStack)) { return targetStack.resumeTopActivityUncheckedLocked(target, targetOptions); } final ActivityRecord r = mFocusedStack.topRunningActivityLocked(); if (r == null || r.state != RESUMED) { mFocusedStack.resumeTopActivityUncheckedLocked(null , null ); } else if (r.state == RESUMED) { mFocusedStack.executeAppTransition(targetOptions); } return false ; }
resumeFocusedStackTopActivityLocked调用了ActivityStack的resumeTopActivityUncheckedLocked方法
1
2
3
4
5
6
7
8
9
10
11
12
13
14
15
16
17
18
19
20
21
22
23
24
25
26
27
28
29
boolean resumeTopActivityUncheckedLocked (ActivityRecord prev, ActivityOptions options) { if (mStackSupervisor.inResumeTopActivity) { return false ; } boolean result = false ; try { mStackSupervisor.inResumeTopActivity = true ; result = resumeTopActivityInnerLocked(prev, options); } finally { mStackSupervisor.inResumeTopActivity = false ; } final ActivityRecord next = topRunningActivityLocked(true ); if (next == null || !next.canTurnScreenOn()) { checkReadyForSleep(); } return result; }
resumeTopActivityInnerLocked方法最终调用ActivityStackSupervisor中的startSpecificActivityLocked方法
1
2
3
4
5
private boolean resumeTopActivityInnerLocked (ActivityRecord prev, ActivityOptions options) { mStackSupervisor.startSpecificActivityLocked(next, true , true ); }
resumeTopActivityInnerLocked方法调用realStartActivityLocked方法
1
2
3
4
5
6
7
8
9
10
11
12
13
14
15
16
17
18
19
20
21
22
23
24
25
26
27
28
29
30
31
32
33
void startSpecificActivityLocked (ActivityRecord r, boolean andResume, boolean checkConfig) { ProcessRecord app = mService.getProcessRecordLocked(r.processName, r.info.applicationInfo.uid, true ); r.getStack().setLaunchTime(r); if (app != null && app.thread != null ) { try { if ((r.info.flags&ActivityInfo.FLAG_MULTIPROCESS) == 0 || !"android" .equals(r.info.packageName)) { app.addPackage(r.info.packageName, r.info.applicationInfo.versionCode, mService.mProcessStats); } realStartActivityLocked(r, app, andResume, checkConfig); return ; } catch (RemoteException e) { Slog.w(TAG, "Exception when starting activity " + r.intent.getComponent().flattenToShortString(), e); } } mService.startProcessLocked(r.processName, r.info.applicationInfo, true , 0 , "activity" , r.intent.getComponent(), false , false , true ); }
在realStartActivityLocked方法中,通过ProcessRecord的thread来启动Activity。而thread是一个IApplicationThread类型的对象,它的具体实现为ActivityThread中的内部类ApplicationThread。
1
2
3
4
5
6
7
8
9
10
11
12
13
14
15
final boolean realStartActivityLocked (ActivityRecord r, ProcessRecord app, boolean andResume, boolean checkConfig) throws RemoteException { app.thread.scheduleLaunchActivity(new Intent (r.intent), r.appToken, System.identityHashCode(r), r.info, mergedConfiguration.getGlobalConfiguration(), mergedConfiguration.getOverrideConfiguration(), r.compat, r.launchedFromPackage, task.voiceInteractor, app.repProcState, r.icicle, r.persistentState, results, newIntents, !andResume, mService.isNextTransitionForward(), profilerInfo); }
1
2
3
4
5
6
7
8
9
10
11
12
13
14
15
16
17
18
19
20
21
22
23
24
25
26
27
28
29
30
31
32
33
34
public final void scheduleLaunchActivity (Intent intent, IBinder token, int ident, ActivityInfo info, Configuration curConfig, Configuration overrideConfig, CompatibilityInfo compatInfo, String referrer, IVoiceInteractor voiceInteractor, int procState, Bundle state, PersistableBundle persistentState, List<ResultInfo> pendingResults, List<ReferrerIntent> pendingNewIntents, boolean notResumed, boolean isForward, ProfilerInfo profilerInfo) { updateProcessState(procState, false ); ActivityClientRecord r = new ActivityClientRecord (); r.token = token; r.ident = ident; r.intent = intent; r.referrer = referrer; r.voiceInteractor = voiceInteractor; r.activityInfo = info; r.compatInfo = compatInfo; r.state = state; r.persistentState = persistentState; r.pendingResults = pendingResults; r.pendingIntents = pendingNewIntents; r.startsNotResumed = notResumed; r.isForward = isForward; r.profilerInfo = profilerInfo; r.overrideConfig = overrideConfig; updatePendingConfiguration(curConfig); sendMessage(H.LAUNCH_ACTIVITY, r); }
到这里,Activity的启动已经转到了ApplicationThread中。在scheduleLaunchActivity方法中,发了一个启动的消息LAUNCH_ACTIVITY出去。
1
2
3
4
5
6
7
8
9
10
11
12
13
14
15
16
public void handleMessage (Message msg) { if (DEBUG_MESSAGES) Slog.v(TAG, ">>> handling: " + codeToString(msg.what)); switch (msg.what) { case LAUNCH_ACTIVITY: { Trace.traceBegin(Trace.TRACE_TAG_ACTIVITY_MANAGER, "activityStart" ); final ActivityClientRecord r = (ActivityClientRecord) msg.obj; r.packageInfo = getPackageInfoNoCheck( r.activityInfo.applicationInfo, r.compatInfo); handleLaunchActivity(r, null , "LAUNCH_ACTIVITY" ); Trace.traceEnd(Trace.TRACE_TAG_ACTIVITY_MANAGER); } break ; } }
在Handler中,调用了ActivityThread的handleLaunchActivity方法
1
2
3
4
5
6
7
8
9
10
11
12
13
14
15
16
17
18
19
20
21
22
23
24
25
26
27
28
29
30
31
32
33
34
35
36
37
38
39
40
41
42
43
private void handleLaunchActivity (ActivityClientRecord r, Intent customIntent, String reason) { WindowManagerGlobal.initialize(); Activity a = performLaunchActivity(r, customIntent); if (a != null ) { r.createdConfig = new Configuration (mConfiguration); reportSizeConfigurations(r); Bundle oldState = r.state; handleResumeActivity(r.token, false , r.isForward, !r.activity.mFinished && !r.startsNotResumed, r.lastProcessedSeq, reason); if (!r.activity.mFinished && r.startsNotResumed) { performPauseActivityIfNeeded(r, reason); if (r.isPreHoneycomb()) { r.state = oldState; } } } else { try { ActivityManager.getService() .finishActivity(r.token, Activity.RESULT_CANCELED, null , Activity.DONT_FINISH_TASK_WITH_ACTIVITY); } catch (RemoteException ex) { throw ex.rethrowFromSystemServer(); } } }
在performLaunchActivity方法中,完成了Activity对象的创建和启动过程。
1
2
3
4
5
6
7
8
9
10
11
12
13
14
15
16
17
18
19
20
21
22
23
24
25
26
27
28
29
30
31
32
33
34
35
36
37
38
39
40
41
42
43
44
45
46
47
48
49
50
51
52
53
54
55
56
57
58
59
60
61
62
63
64
65
66
67
68
69
70
71
72
73
74
75
76
77
78
79
80
81
82
83
84
85
86
87
88
89
90
91
92
93
94
95
private Activity performLaunchActivity (ActivityClientRecord r, Intent customIntent) { ContextImpl appContext = createBaseContextForActivity(r); Activity activity = null ; try { java.lang.ClassLoader cl = appContext.getClassLoader(); activity = mInstrumentation.newActivity( cl, component.getClassName(), r.intent); } catch (Exception e) { if (!mInstrumentation.onException(activity, e)) { throw new RuntimeException ( "Unable to instantiate activity " + component + ": " + e.toString(), e); } } try { Application app = r.packageInfo.makeApplication(false , mInstrumentation); if (activity != null ) { Window window = null ; if (r.mPendingRemoveWindow != null && r.mPreserveWindow) { window = r.mPendingRemoveWindow; r.mPendingRemoveWindow = null ; r.mPendingRemoveWindowManager = null ; } appContext.setOuterContext(activity); activity.attach(appContext, this , getInstrumentation(), r.token, r.ident, app, r.intent, r.activityInfo, title, r.parent, r.embeddedID, r.lastNonConfigurationInstances, config, r.referrer, r.voiceInteractor, window, r.configCallback); if (r.isPersistable()) { mInstrumentation.callActivityOnCreate(activity, r.state, r.persistentState); } else { mInstrumentation.callActivityOnCreate(activity, r.state); } if (!activity.mCalled) { throw new SuperNotCalledException ( "Activity " + r.intent.getComponent().toShortString() + " did not call through to super.onCreate()" ); } r.activity = activity; r.stopped = true ; if (!r.activity.mFinished) { activity.performStart(); r.stopped = false ; } if (!r.activity.mFinished) { if (r.isPersistable()) { if (r.state != null || r.persistentState != null ) { mInstrumentation.callActivityOnRestoreInstanceState(activity, r.state, r.persistentState); } } else if (r.state != null ) { mInstrumentation.callActivityOnRestoreInstanceState(activity, r.state); } } if (!r.activity.mFinished) { activity.mCalled = false ; if (r.isPersistable()) { mInstrumentation.callActivityOnPostCreate(activity, r.state, r.persistentState); } else { mInstrumentation.callActivityOnPostCreate(activity, r.state); } if (!activity.mCalled) { throw new SuperNotCalledException ( "Activity " + r.intent.getComponent().toShortString() + " did not call through to super.onPostCreate()" ); } } } r.paused = true ; mActivities.put(r.token, r); } catch (SuperNotCalledException e) { throw e; } catch (Exception e) { if (!mInstrumentation.onException(activity, e)) { throw new RuntimeException ( "Unable to start activity " + component + ": " + e.toString(), e); } } return activity; }
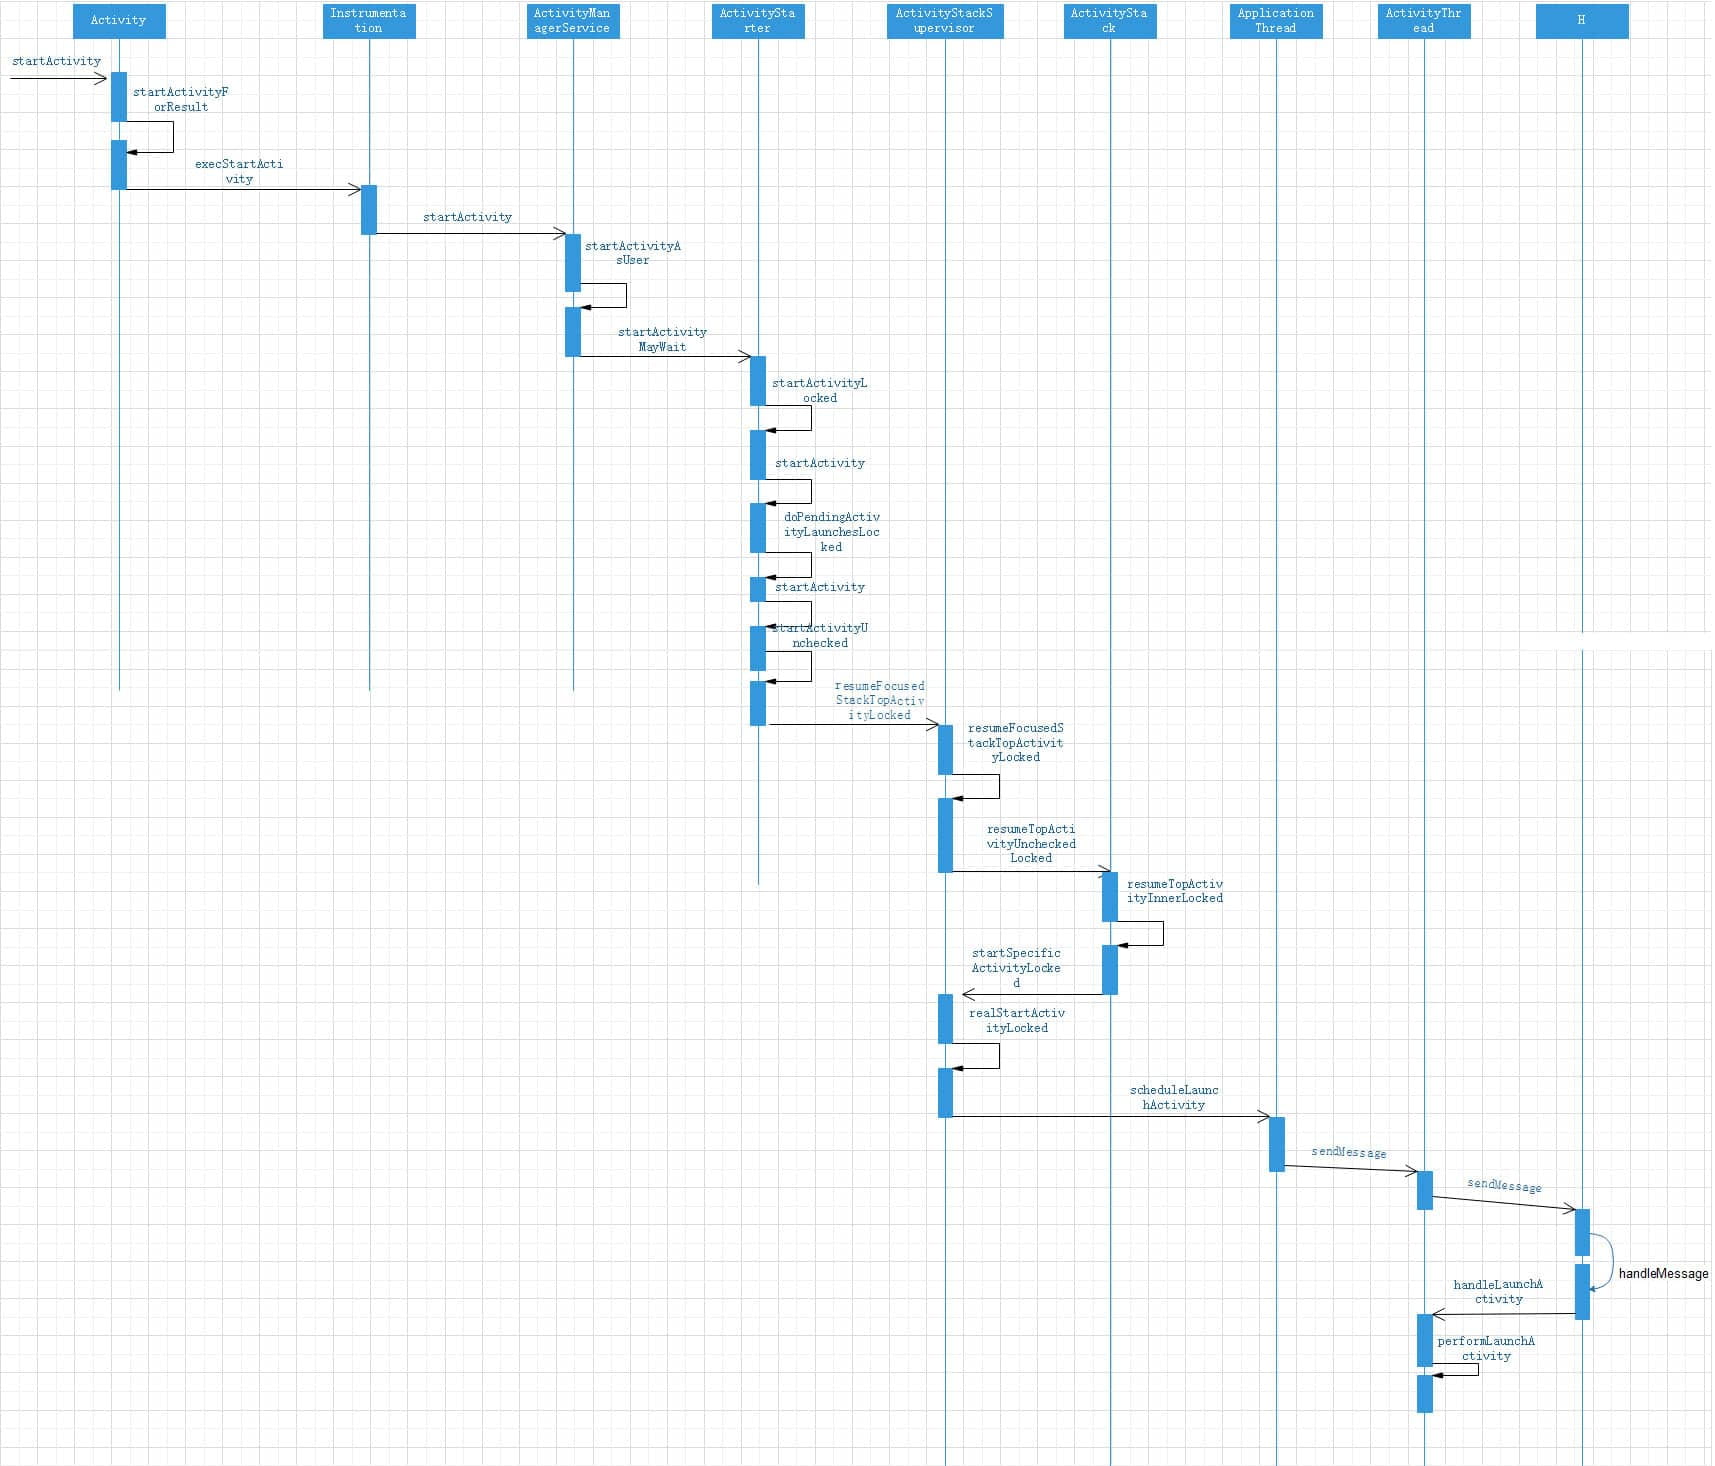
Activity启动时序图
Service的工作过程 Service的启动过程 Service的启动是从ContextWrapper的startService开始
1
2
3
public ComponentName startService (Intent service) { return mBase.startService(service); }
mBase的具体类型是ContextImpl,Activity创建时会通过attach将一个ContextImpl对象关联起来。startService方法会调用startServiceCommon方法。
1
2
3
4
public ComponentName startService (Intent service) { warnIfCallingFromSystemProcess(); return startServiceCommon(service, false , mUser); }
startServiceCommon对象会调用ActivityManagerService的startService方法,这是一个远程调用的过程。
1
2
3
4
5
6
7
8
9
private ComponentName startServiceCommon (Intent service, boolean requireForeground, UserHandle user) { ComponentName cn = ActivityManager.getService().startService( mMainThread.getApplicationThread(), service, service.resolveTypeIfNeeded( getContentResolver()), requireForeground, getOpPackageName(), user.getIdentifier()); }
ActivityManagerService的startService方法
1
2
3
4
5
6
7
8
9
public ComponentName startService (IApplicationThread caller, Intent service, String resolvedType, boolean requireForeground, String callingPackage, int userId) throws TransactionTooLargeException { res = mServices.startServiceLocked(caller, service, resolvedType, callingPid, callingUid, requireForeground, callingPackage, userId); }
startService方法会调用ActiveServices的startServiceLocked方法
1
2
3
4
5
6
7
ComponentName startServiceLocked (IApplicationThread caller, Intent service, String resolvedType, int callingPid, int callingUid, boolean fgRequired, String callingPackage, final int userId) throws TransactionTooLargeException { ComponentName cmp = startServiceInnerLocked(smap, service, r, callerFg, addToStarting); return cmp; }
在startServiceLocked方法里会调用startServiceInnerLocked方法
1
2
3
4
5
6
7
8
9
ComponentName startServiceInnerLocked (ServiceMap smap, Intent service, ServiceRecord r, boolean callerFg, boolean addToStarting) throws TransactionTooLargeException { String error = bringUpServiceLocked(r, service.getFlags(), callerFg, false , false ); if (error != null ) { return new ComponentName ("!!" , error); } }
startServiceInnerLocked里调用了bringUpServiceLocked方法
1
2
3
4
5
6
7
private String bringUpServiceLocked (ServiceRecord r, int intentFlags, boolean execInFg, boolean whileRestarting, boolean permissionsReviewRequired) throws TransactionTooLargeException { realStartServiceLocked(r, app, execInFg); }
bringUpServiceLocked里调用realStartServiceLocked方法
1
2
3
4
5
6
7
8
9
10
11
12
private final void realStartServiceLocked (ServiceRecord r, ProcessRecord app, boolean execInFg) throws RemoteException { app.thread.scheduleCreateService(r, r.serviceInfo, mAm.compatibilityInfoForPackageLocked(r.serviceInfo.applicationInfo), app.repProcState); sendServiceArgsLocked(r, execInFg, true ); }
realStartServiceLocked调用ApplicationThread中的scheduleCreateService方法
1
2
3
4
5
6
7
8
9
10
public final void scheduleCreateService (IBinder token, ServiceInfo info, CompatibilityInfo compatInfo, int processState) { updateProcessState(processState, false ); CreateServiceData s = new CreateServiceData (); s.token = token; s.info = info; s.compatInfo = compatInfo; sendMessage(H.CREATE_SERVICE, s); }
在scheduleCreateService方法里,发了一个创建服务的消息出去。Handler处理CREATE_SERVICE的消息,并通过ActivityThread的handleCreateService方法来完成Service的启动。
1
2
3
4
5
6
7
8
9
10
11
12
13
14
15
16
17
18
19
20
21
22
23
24
25
26
27
28
29
30
31
32
33
34
35
36
37
38
39
40
41
42
43
44
private void handleCreateService (CreateServiceData data) { unscheduleGcIdler(); LoadedApk packageInfo = getPackageInfoNoCheck( data.info.applicationInfo, data.compatInfo); Service service = null ; try { java.lang.ClassLoader cl = packageInfo.getClassLoader(); service = (Service) cl.loadClass(data.info.name).newInstance(); } catch (Exception e) { if (!mInstrumentation.onException(service, e)) { throw new RuntimeException ( "Unable to instantiate service " + data.info.name + ": " + e.toString(), e); } } try { if (localLOGV) Slog.v(TAG, "Creating service " + data.info.name); ContextImpl context = ContextImpl.createAppContext(this , packageInfo); context.setOuterContext(service); Application app = packageInfo.makeApplication(false , mInstrumentation); service.attach(context, this , data.info.name, data.token, app, ActivityManager.getService()); service.onCreate(); mServices.put(data.token, service); try { ActivityManager.getService().serviceDoneExecuting( data.token, SERVICE_DONE_EXECUTING_ANON, 0 , 0 ); } catch (RemoteException e) { throw e.rethrowFromSystemServer(); } } catch (Exception e) { if (!mInstrumentation.onException(service, e)) { throw new RuntimeException ( "Unable to create service " + data.info.name + ": " + e.toString(), e); } } }
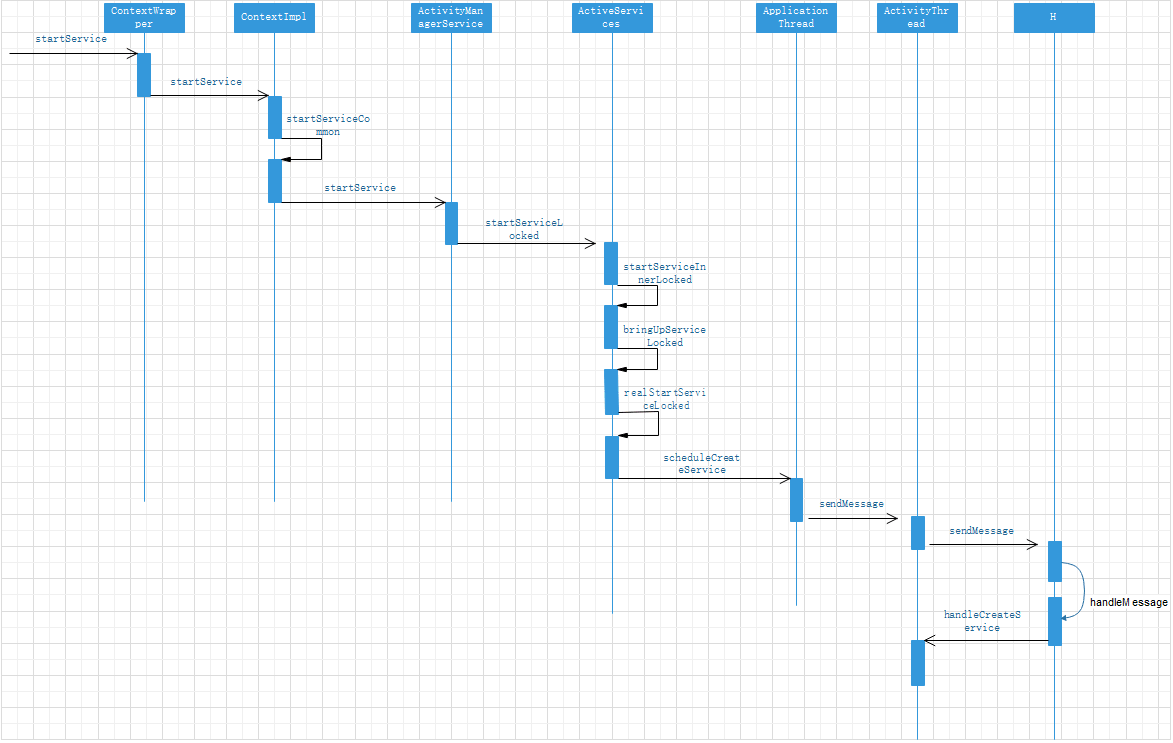
Service启动的时序图
Service的绑定过程 Service的绑定是从ContextWrapper的bindService方法开始的
1
2
3
4
public boolean bindService (Intent service, ServiceConnection conn, int flags) { return mBase.bindService(service, conn, flags); }
然后调用ContextImpl的bindService方法
1
2
3
4
5
6
public boolean bindService (Intent service, ServiceConnection conn, int flags) { warnIfCallingFromSystemProcess(); return bindServiceCommon(service, conn, flags, mMainThread.getHandler(), Process.myUserHandle()); }
bindService调用bindServiceCommon方法
1
2
3
4
5
6
7
8
9
private boolean bindServiceCommon (Intent service, ServiceConnection conn, int flags, Handler handler, UserHandle user) { int res = ActivityManager.getService().bindService( mMainThread.getApplicationThread(), getActivityToken(), service, service.resolveTypeIfNeeded(getContentResolver()), sd, flags, getOpPackageName(), user.getIdentifier()); }
bindServiceCommon调用ActivityManagerService的bindService方法
1
2
3
4
5
6
7
8
9
public int bindService (IApplicationThread caller, IBinder token, Intent service, String resolvedType, IServiceConnection connection, int flags, String callingPackage, int userId) throws TransactionTooLargeException { synchronized (this ) { return mServices.bindServiceLocked(caller, token, service, resolvedType, connection, flags, callingPackage, userId); } }
bindService调用ActiveServices中的bindServiceLocked方法
1
2
3
4
5
6
7
int bindServiceLocked (IApplicationThread caller, IBinder token, Intent service, String resolvedType, final IServiceConnection connection, int flags, String callingPackage, final int userId) throws TransactionTooLargeException { bringUpServiceLocked(serviceRecord,serviceIntent.getFlags(),callerFg, false , false ); }
bindServiceLocked调用bringUpServiceLocked方法
1
2
3
4
5
6
7
private String bringUpServiceLocked (ServiceRecord r, int intentFlags, boolean execInFg, boolean whileRestarting, boolean permissionsReviewRequired) throws TransactionTooLargeException { realStartServiceLocked(r, app, execInFg); }
bringUpServiceLocked调用realStartServiceLocked方法。这个过程和之前的启动过程已经是一样的。不同的是,Service绑定过程还会调用ApplicationThread的scheduleBindService方法,这个过程是在ActiveServices的requestServiceBindingLocked方法中
1
2
3
4
5
6
7
8
9
10
11
12
13
14
15
16
17
18
19
20
21
22
23
24
25
26
27
28
29
30
31
32
33
34
35
private final boolean requestServiceBindingLocked (ServiceRecord r, IntentBindRecord i, boolean execInFg, boolean rebind) throws TransactionTooLargeException { if (r.app == null || r.app.thread == null ) { return false ; } if (DEBUG_SERVICE) Slog.d(TAG_SERVICE, "requestBind " + i + ": requested=" + i.requested + " rebind=" + rebind); if ((!i.requested || rebind) && i.apps.size() > 0 ) { try { bumpServiceExecutingLocked(r, execInFg, "bind" ); r.app.forceProcessStateUpTo(ActivityManager.PROCESS_STATE_SERVICE); r.app.thread.scheduleBindService(r, i.intent.getIntent(), rebind, r.app.repProcState); if (!rebind) { i.requested = true ; } i.hasBound = true ; i.doRebind = false ; } catch (TransactionTooLargeException e) { if (DEBUG_SERVICE) Slog.v(TAG_SERVICE, "Crashed while binding " + r, e); final boolean inDestroying = mDestroyingServices.contains(r); serviceDoneExecutingLocked(r, inDestroying, inDestroying); throw e; } catch (RemoteException e) { if (DEBUG_SERVICE) Slog.v(TAG_SERVICE, "Crashed while binding " + r); final boolean inDestroying = mDestroyingServices.contains(r); serviceDoneExecutingLocked(r, inDestroying, inDestroying); return false ; } } return true ; }
1
2
3
4
5
6
7
8
9
10
11
12
13
public final void scheduleBindService (IBinder token, Intent intent, boolean rebind, int processState) { updateProcessState(processState, false ); BindServiceData s = new BindServiceData (); s.token = token; s.intent = intent; s.rebind = rebind; if (DEBUG_SERVICE) Slog.v(TAG, "scheduleBindService token=" + token + " intent=" + intent + " uid=" + Binder.getCallingUid() + " pid=" + Binder.getCallingPid()); sendMessage(H.BIND_SERVICE, s); }
在scheduleBindService方法里,发送一个绑定服务的消息。在ActivityThread里调用handleBindService方法
1
2
3
4
5
6
7
8
9
10
11
12
13
14
15
16
17
18
19
20
21
22
23
24
25
26
27
28
29
30
31
private void handleBindService (BindServiceData data) { Service s = mServices.get(data.token); if (DEBUG_SERVICE) Slog.v(TAG, "handleBindService s=" + s + " rebind=" + data.rebind); if (s != null ) { try { data.intent.setExtrasClassLoader(s.getClassLoader()); data.intent.prepareToEnterProcess(); try { if (!data.rebind) { IBinder binder = s.onBind(data.intent); ActivityManager.getService().publishService( data.token, data.intent, binder); } else { s.onRebind(data.intent); ActivityManager.getService().serviceDoneExecuting( data.token, SERVICE_DONE_EXECUTING_ANON, 0 , 0 ); } ensureJitEnabled(); } catch (RemoteException ex) { throw ex.rethrowFromSystemServer(); } } catch (Exception e) { if (!mInstrumentation.onException(s, e)) { throw new RuntimeException ( "Unable to bind to service " + s + " with " + data.intent + ": " + e.toString(), e); } } } }
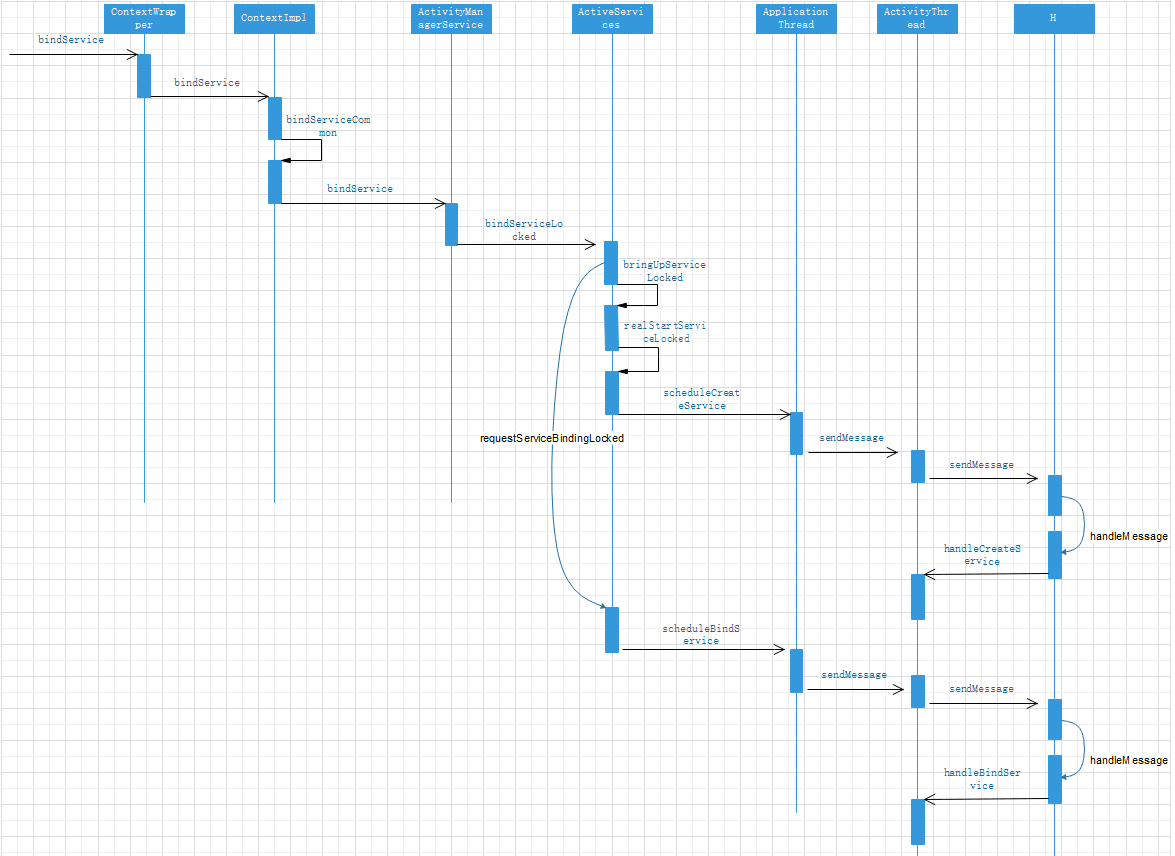
服务的绑定时序图:
BroadcastReceiver的工作过程 广播的注册过程 广播的注册分为静态注册和动态注册,其中静态注册的广播在应用安装时由系统自动完成注册。这里只分析广播的动态注册过程。动态注册是从ContextWrapper的registerReceiver方法开始的
1
2
3
4
public Intent registerReceiver ( BroadcastReceiver receiver, IntentFilter filter) { return mBase.registerReceiver(receiver, filter); }
registerReceiver调用ContextImpl中的registerReceiver方法
1
2
3
public Intent registerReceiver (BroadcastReceiver receiver, IntentFilter filter) { return registerReceiver(receiver, filter, null , null ); }
registerReceiver再调用内部的registerReceiver方法
1
2
3
4
5
public Intent registerReceiver (BroadcastReceiver receiver, IntentFilter filter, String broadcastPermission, Handler scheduler) { return registerReceiverInternal(receiver, getUserId(), filter, broadcastPermission, scheduler, getOuterContext(), 0 ); }
registerReceiver会调用registerReceiverInternal方法
1
2
3
4
5
6
7
8
9
10
11
12
13
14
15
16
17
private Intent registerReceiverInternal (BroadcastReceiver receiver, int userId, IntentFilter filter, String broadcastPermission, Handler scheduler, Context context, int flags) { try { final Intent intent = ActivityManager.getService().registerReceiver( mMainThread.getApplicationThread(), mBasePackageName, rd, filter, broadcastPermission, userId, flags); if (intent != null ) { intent.setExtrasClassLoader(getClassLoader()); intent.prepareToEnterProcess(); } return intent; } catch (RemoteException e) { throw e.rethrowFromSystemServer(); } }
registerReceiverInternal调用了AMS的registerReceiver方法
1
2
3
4
5
6
7
8
9
10
11
12
13
14
15
16
17
public Intent registerReceiver (IApplicationThread caller, String callerPackage, IIntentReceiver receiver, IntentFilter filter, String permission, int userId, int flags) { synchronized (this ) { BroadcastFilter bf = new BroadcastFilter (filter, rl, callerPackage, permission, callingUid, userId, instantApp, visibleToInstantApps); rl.add(bf); if (!bf.debugCheck()) { Slog.w(TAG, "==> For Dynamic broadcast" ); } mReceiverResolver.addFilter(bf); return sticky; } }
广播的发送和接收过程 广播的发送是通过ContextWrapper的sendBroadcast方法实现的
1
2
3
public void sendBroadcast (Intent intent) { mBase.sendBroadcast(intent); }
sendBroadcast调用了ContextImpl中的sendBroadcast方法
1
2
3
4
5
6
7
8
9
10
11
12
13
public void sendBroadcast (Intent intent) { warnIfCallingFromSystemProcess(); String resolvedType = intent.resolveTypeIfNeeded(getContentResolver()); try { intent.prepareToLeaveProcess(this ); ActivityManager.getService().broadcastIntent( mMainThread.getApplicationThread(), intent, resolvedType, null , Activity.RESULT_OK, null , null , null , AppOpsManager.OP_NONE, null , false , false , getUserId()); } catch (RemoteException e) { throw e.rethrowFromSystemServer(); } }
sendBroadcast调用了AMS的broadcastIntent方法
1
2
3
4
5
6
7
8
9
10
11
12
13
14
15
16
17
18
19
20
21
22
public final int broadcastIntent (IApplicationThread caller, Intent intent, String resolvedType, IIntentReceiver resultTo, int resultCode, String resultData, Bundle resultExtras, String[] requiredPermissions, int appOp, Bundle bOptions, boolean serialized, boolean sticky, int userId) { enforceNotIsolatedCaller("broadcastIntent" ); synchronized (this ) { intent = verifyBroadcastLocked(intent); final ProcessRecord callerApp = getRecordForAppLocked(caller); final int callingPid = Binder.getCallingPid(); final int callingUid = Binder.getCallingUid(); final long origId = Binder.clearCallingIdentity(); int res = broadcastIntentLocked(callerApp, callerApp != null ? callerApp.info.packageName : null , intent, resolvedType, resultTo, resultCode, resultData, resultExtras, requiredPermissions, appOp, bOptions, serialized, sticky, callingPid, callingUid, userId); Binder.restoreCallingIdentity(origId); return res; } }
broadcastIntent调用broadcastIntentLocked方法
1
2
3
4
5
6
7
8
9
10
final int broadcastIntentLocked (ProcessRecord callerApp, String callerPackage, Intent intent, String resolvedType, IIntentReceiver resultTo, int resultCode, String resultData, Bundle resultExtras, String[] requiredPermissions, int appOp, Bundle bOptions, boolean ordered, boolean sticky, int callingPid, int callingUid, int userId) { queue.enqueueOrderedBroadcastLocked(r); queue.scheduleBroadcastsLocked(); }
broadcastIntentLocked调用了BroadcastQueue的enqueueOrderedBroadcastLocked将广播添加到队列中,通过BroadcastQueue的scheduleBroadcastsLocked来处理队列中的广播。
1
2
3
4
5
6
7
8
9
10
11
public void scheduleBroadcastsLocked () { if (DEBUG_BROADCAST) Slog.v(TAG_BROADCAST, "Schedule broadcasts [" + mQueueName + "]: current=" + mBroadcastsScheduled); if (mBroadcastsScheduled) { return ; } mHandler.sendMessage(mHandler.obtainMessage(BROADCAST_INTENT_MSG, this )); mBroadcastsScheduled = true ; }
在scheduleBroadcastsLocked方法中,通过Handler发送了一个BROADCAST_INTENT_MSG的消息
1
2
3
4
5
6
7
8
9
10
11
12
13
14
public void handleMessage (Message msg) { switch (msg.what) { case BROADCAST_INTENT_MSG: { if (DEBUG_BROADCAST) Slog.v( TAG_BROADCAST, "Received BROADCAST_INTENT_MSG" ); processNextBroadcast(true ); } break ; case BROADCAST_TIMEOUT_MSG: { synchronized (mService) { broadcastTimeoutLocked(true ); } } break ; } }
在Handler的handleMessage方法中处理消息,调用了processNextBroadcast方法
1
2
3
4
5
final void processNextBroadcast (boolean fromMsg) { deliverToRegisteredReceiverLocked(r, filter, r.ordered, recIdx); }
processNextBroadcast方法调用deliverToRegisteredReceiverLocked
1
2
3
4
5
6
7
8
private void deliverToRegisteredReceiverLocked (BroadcastRecord r, BroadcastFilter filter, boolean ordered, int index) { performReceiveLocked(filter.receiverList.app, filter.receiverList.receiver, new Intent (r.intent), r.resultCode, r.resultData, r.resultExtras, r.ordered, r.initialSticky, r.userId); }
deliverToRegisteredReceiverLocked调用performReceiveLocked
1
2
3
4
5
6
7
8
9
10
11
12
13
14
15
16
17
18
19
20
21
22
23
24
25
26
27
28
29
30
31
32
33
34
void performReceiveLocked (ProcessRecord app, IIntentReceiver receiver, Intent intent, int resultCode, String data, Bundle extras, boolean ordered, boolean sticky, int sendingUser) throws RemoteException { if (app != null ) { if (app.thread != null ) { try { app.thread.scheduleRegisteredReceiver(receiver, intent, resultCode, data, extras, ordered, sticky, sendingUser, app.repProcState); } catch (RemoteException ex) { synchronized (mService) { Slog.w(TAG, "Can't deliver broadcast to " + app.processName + " (pid " + app.pid + "). Crashing it." ); app.scheduleCrash("can't deliver broadcast" ); } throw ex; } } else { throw new RemoteException ("app.thread must not be null" ); } } else { receiver.performReceive(intent, resultCode, data, extras, ordered, sticky, sendingUser); } }
performReceiveLocked调用ApplicationThread的scheduleRegisteredReceiver方法
1
2
3
4
5
6
7
public void scheduleRegisteredReceiver (IIntentReceiver receiver, Intent intent, int resultCode, String dataStr, Bundle extras, boolean ordered, boolean sticky, int sendingUser, int processState) throws RemoteException { updateProcessState(processState, false ); receiver.performReceive(intent, resultCode, dataStr, extras, ordered, sticky, sendingUser); }
scheduleRegisteredReceiver里调用LoadedApk的内部类ReceiverDispatcher中的performReceive方法
1
2
3
4
5
6
7
8
9
10
11
12
13
14
15
16
17
18
19
20
21
22
23
24
25
26
public void performReceive (Intent intent, int resultCode, String data, Bundle extras, boolean ordered, boolean sticky, int sendingUser) { LoadedApk.ReceiverDispatcher rd; if (intent == null ) { Log.wtf("LoadedApk" , "Null intent received" ); rd = null ; } else { rd = (LoadedApk.ReceiverDispatcher)this .mDispatcher.get(); } if (rd != null ) { rd.performReceive(intent, resultCode, data, extras, ordered, sticky, sendingUser); } else { IActivityManager mgr = ActivityManagerNative.getDefault(); try { if (extras != null ) { extras.setAllowFds(false ); } mgr.finishReceiver(this , resultCode, data, extras, false , intent.getFlags()); } catch (RemoteException var11) { throw var11.rethrowFromSystemServer(); } } }
performReceive调用performReceive的重载
1
2
3
4
5
6
7
8
9
10
11
12
public void performReceive (Intent intent, int resultCode, String data, Bundle extras, boolean ordered, boolean sticky, int sendingUser) { LoadedApk.ReceiverDispatcher.Args args = new LoadedApk .ReceiverDispatcher.Args(intent, resultCode, data, extras, ordered, sticky, sendingUser); if (intent == null ) { Log.wtf("LoadedApk" , "Null intent received" ); } if ((intent == null || !this .mActivityThread.post(args)) && this .mRegistered && ordered) { IActivityManager mgr = ActivityManagerNative.getDefault(); args.sendFinished(mgr); } }
performReceive调用ActivityThread的内部类Handler的post方法,将Args发送出去,Args是一个Runnable接口,在Handler处理消息时,会回调Args的run方法
1
2
3
4
5
public void run () { receiver.onReceive(ReceiverDispatcher.this .mContext, intent); }
在run中回调receiver的onReceiver方法
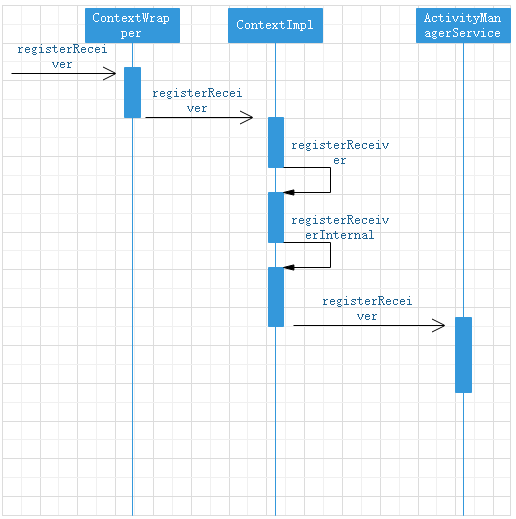
广播注册的时序图
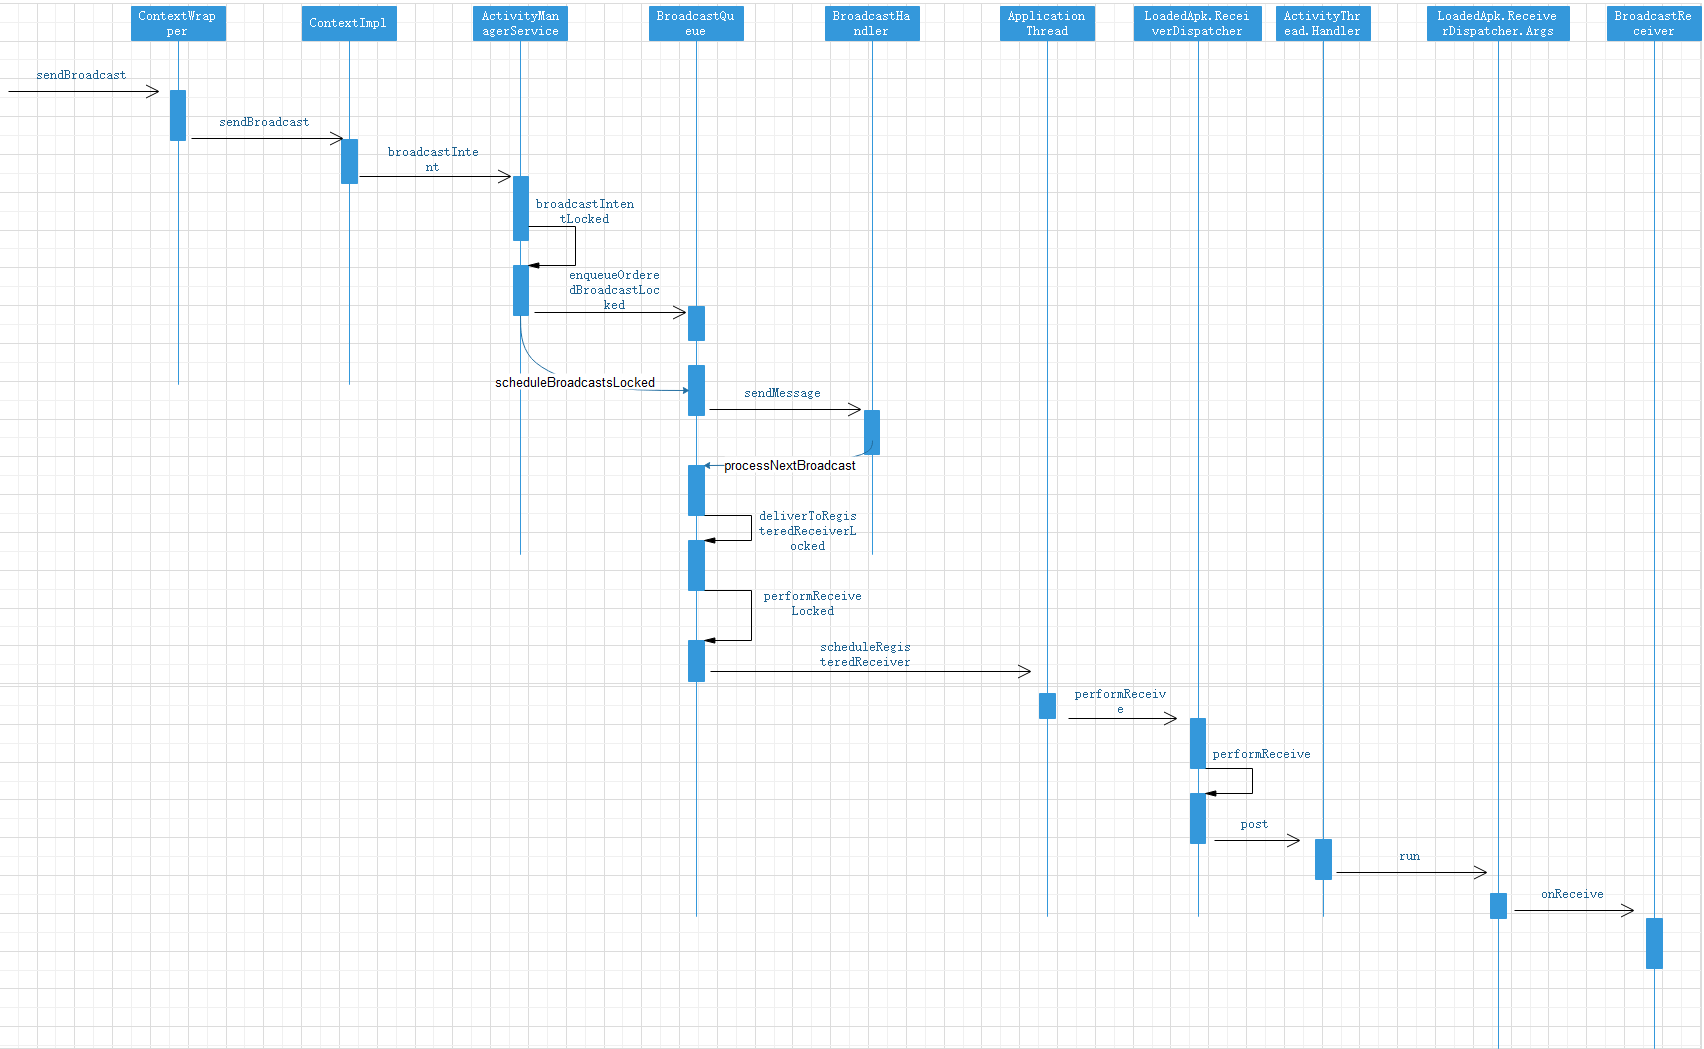
广播发送及接收的时序图
ContentProvider的工作过程 当ContentProvider所在的进程启动时,ContentProvider会同时启动并被发布到AMS中,这个时候ContentProvider的onCreate要先于Application的onCreate执行。
应用启动时的入口为ActivityThread的main方法
1
2
3
4
5
6
7
8
9
10
11
12
13
14
15
16
17
18
19
20
21
22
public static void main (String[] args) { Looper.prepareMainLooper(); ActivityThread thread = new ActivityThread (); thread.attach(false ); if (sMainThreadHandler == null ) { sMainThreadHandler = thread.getHandler(); } if (false ) { Looper.myLooper().setMessageLogging(new LogPrinter (Log.DEBUG, "ActivityThread" )); } Trace.traceEnd(Trace.TRACE_TAG_ACTIVITY_MANAGER); Looper.loop(); throw new RuntimeException ("Main thread loop unexpectedly exited" ); }
在main方法中,会创建ActivityThread的实例,并调用attach方法,然后调用Looper.loop方法。这里主要分析attach方法。
1
2
3
4
5
6
7
8
9
10
private void attach (boolean system) { final IActivityManager mgr = ActivityManager.getService(); try { mgr.attachApplication(mAppThread); } catch (RemoteException ex) { throw ex.rethrowFromSystemServer(); } }
在attach中,调用AMS的attachApplication方法
1
2
3
4
5
6
7
8
public final void attachApplication (IApplicationThread thread) { synchronized (this ) { int callingPid = Binder.getCallingPid(); final long origId = Binder.clearCallingIdentity(); attachApplicationLocked(thread, callingPid); Binder.restoreCallingIdentity(origId); } }
attachApplication调用attachApplicationLocked方法
1
2
3
4
5
6
7
8
9
10
11
12
13
14
15
16
private final boolean attachApplicationLocked (IApplicationThread thread, int pid) { thread.bindApplication(processName, appInfo, providers, app.instr.mClass, profilerInfo, app.instr.mArguments, app.instr.mWatcher, app.instr.mUiAutomationConnection, testMode, mBinderTransactionTrackingEnabled, enableTrackAllocation, isRestrictedBackupMode || !normalMode, app.persistent, new Configuration (getGlobalConfiguration()), app.compat, getCommonServicesLocked(app.isolated), mCoreSettingsObserver.getCoreSettingsLocked(), buildSerial); }
attachApplicationLocked调用ApplicationThread的bindApplication方法
1
2
3
4
5
6
7
8
9
10
11
12
13
14
15
16
17
18
19
20
21
22
23
24
25
26
27
28
29
30
31
32
33
34
35
36
public final void bindApplication (String processName, ApplicationInfo appInfo, List<ProviderInfo> providers, ComponentName instrumentationName, ProfilerInfo profilerInfo, Bundle instrumentationArgs, IInstrumentationWatcher instrumentationWatcher, IUiAutomationConnection instrumentationUiConnection, int debugMode, boolean enableBinderTracking, boolean trackAllocation, boolean isRestrictedBackupMode, boolean persistent, Configuration config, CompatibilityInfo compatInfo, Map services, Bundle coreSettings, String buildSerial) { if (services != null ) { ServiceManager.initServiceCache(services); } setCoreSettings(coreSettings); AppBindData data = new AppBindData (); data.processName = processName; data.appInfo = appInfo; data.providers = providers; data.instrumentationName = instrumentationName; data.instrumentationArgs = instrumentationArgs; data.instrumentationWatcher = instrumentationWatcher; data.instrumentationUiAutomationConnection = instrumentationUiConnection; data.debugMode = debugMode; data.enableBinderTracking = enableBinderTracking; data.trackAllocation = trackAllocation; data.restrictedBackupMode = isRestrictedBackupMode; data.persistent = persistent; data.config = config; data.compatInfo = compatInfo; data.initProfilerInfo = profilerInfo; data.buildSerial = buildSerial; sendMessage(H.BIND_APPLICATION, data); }
bindApplication发送消息BIND_APPLICATION给Handler
1
2
3
4
5
6
7
8
9
10
11
12
public void handleMessage (Message msg) { if (DEBUG_MESSAGES) Slog.v(TAG, ">>> handling: " + codeToString(msg.what)); switch (msg.what) { case BIND_APPLICATION: Trace.traceBegin(Trace.TRACE_TAG_ACTIVITY_MANAGER, "bindApplication" ); AppBindData data = (AppBindData)msg.obj; handleBindApplication(data); Trace.traceEnd(Trace.TRACE_TAG_ACTIVITY_MANAGER); break ; } }
handleMessage中调用ActivityThread中的handleBindApplication方法
1
2
3
4
5
6
7
8
9
10
11
12
13
14
15
16
private void handleBindApplication (AppBindData data) { app = data.info.makeApplication(data.restrictedBackupMode, null ); mInitialApplication = app; if (!data.restrictedBackupMode) { if (!ArrayUtils.isEmpty(data.providers)) { installContentProviders(app, data.providers); mH.sendEmptyMessageDelayed(H.ENABLE_JIT, 10 *1000 ); } } mInstrumentation.callApplicationOnCreate(app); }
handleBindApplication中创建了application实例和ContentProvider,并且Application的onCreate回调在ContentProvider之后。
下面来看installContentProviders方法
1
2
3
4
5
6
7
8
9
10
11
12
13
14
15
16
17
18
19
20
21
22
23
24
25
26
27
28
29
30
private void installContentProviders ( Context context, List<ProviderInfo> providers) { final ArrayList<ContentProviderHolder> results = new ArrayList <>(); for (ProviderInfo cpi : providers) { if (DEBUG_PROVIDER) { StringBuilder buf = new StringBuilder (128 ); buf.append("Pub " ); buf.append(cpi.authority); buf.append(": " ); buf.append(cpi.name); Log.i(TAG, buf.toString()); } ContentProviderHolder cph = installProvider(context, null , cpi, false , true , true ); if (cph != null ) { cph.noReleaseNeeded = true ; results.add(cph); } } try { ActivityManager.getService().publishContentProviders( getApplicationThread(), results); } catch (RemoteException ex) { throw ex.rethrowFromSystemServer(); } }
在注释1处调用installProvider方法。注释2处调用AMS的publishContentProviders方法
1
2
3
4
5
6
7
8
9
10
11
12
13
14
15
16
17
18
19
private ContentProviderHolder installProvider (Context context, ContentProviderHolder holder, ProviderInfo info, boolean noisy, boolean noReleaseNeeded, boolean stable) { localProvider = (ContentProvider)cl. loadClass(info.name).newInstance(); provider = localProvider.getIContentProvider(); if (provider == null ) { Slog.e(TAG, "Failed to instantiate class " + info.name + " from sourceDir " + info.applicationInfo.sourceDir); return null ; } if (DEBUG_PROVIDER) Slog.v( TAG, "Instantiating local provider " + info.name); localProvider.attachInfo(c, info); }
在installProvider创建了provider,并调用了attachInfo方法
1
2
3
4
5
6
7
8
9
10
11
12
13
14
15
16
17
18
19
20
21
22
23
24
25
private void attachInfo (Context context, ProviderInfo info, boolean testing) { mNoPerms = testing; if (mContext == null ) { mContext = context; if (context != null ) { mTransport.mAppOpsManager = (AppOpsManager) context.getSystemService( Context.APP_OPS_SERVICE); } mMyUid = Process.myUid(); if (info != null ) { setReadPermission(info.readPermission); setWritePermission(info.writePermission); setPathPermissions(info.pathPermissions); mExported = info.exported; mSingleUser = (info.flags & ProviderInfo.FLAG_SINGLE_USER) != 0 ; setAuthorities(info.authority); } ContentProvider.this .onCreate(); } }
在attchInfo中调用了onCreate方法
再看AMS的publishContentProviders方法
1
2
3
4
5
6
7
8
9
10
11
12
13
14
15
public final void publishContentProviders (IApplicationThread caller, List<ContentProviderHolder> providers) { ComponentName comp = new ComponentName (dst.info.packageName, dst.info.name); mProviderMap.putProviderByClass(comp, dst); String names[] = dst.info.authority.split(";" ); for (int j = 0 ; j < names.length; j++) { mProviderMap.putProviderByName(names[j], dst); } if (wasInLaunchingProviders) { mHandler.removeMessages(CONTENT_PROVIDER_PUBLISH_TIMEOUT_MSG, r); } }
在publishContentProviders方法中,主要是将provider信息保存到Map中,移除CONTENT_PROVIDER_PUBLISH_TIMEOUT_MSG消息。因为在AMS的attachApplicationLocked方法中发送了一个CONTENT_PROVIDER_PUBLISH_TIMEOUT_MSG消息,以便在超时的时候作出相应的处理。
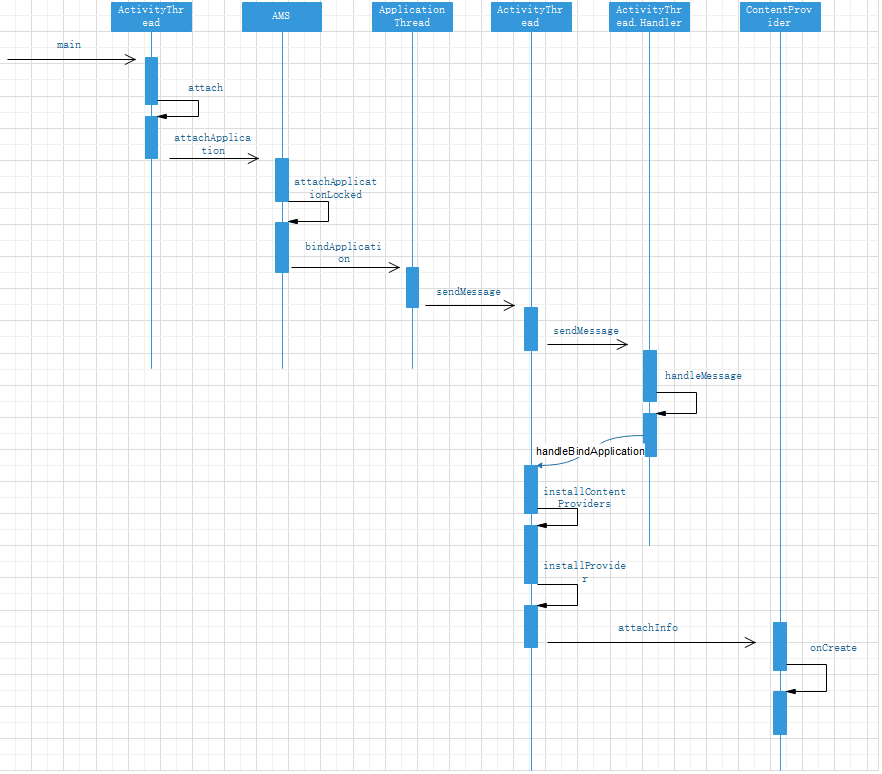
ContentProvider的启动时序图
访问ContentProvider需要通过ContentResolver,ContentResolver是一个抽象类,通过Context获取到的ContentResolver,其实是ContextImpl中的内部类ApplicationContentResolver的一个实例。当ContentProvider所在进程未启动时,第一次访问它就会触发ContentProvider的创建,ContentProvider的进程也会启动。通过ContentProvider的增删改查的任何一个方法都会触发ContentProvider的启动。这里选择query方法来分析。
ContentProvider的使用方法一般是如下这样:
1 context.getContentResolver().query()
context的实现类是ContextWrapper.来看ContextWrapper的getContentResolver方法
1
2
3
public ContentResolver getContentResolver () { return mBase.getContentResolver(); }
getContentResolver调用ContextImpl的getContentResolver方法
1
2
3
public ContentResolver getContentResolver () { return mContentResolver; }
mContentResolver是在ContextImpl的构造函数中初始化的
1
2
3
4
5
6
7
8
private ContextImpl (@Nullable ContextImpl container, @NonNull ActivityThread mainThread, @NonNull LoadedApk packageInfo, @Nullable String splitName, @Nullable IBinder activityToken, @Nullable UserHandle user, int flags, @Nullable ClassLoader classLoader) { mContentResolver = new ApplicationContentResolver (this , mainThread, user); }
ApplicationContentResolver是ContextImpl的内部类。实例化ContentResolver后,调用query方法
1
2
3
4
5
6
7
public final @Nullable Cursor query (final @RequiresPermission .Read @NonNull Uri uri, @Nullable String[] projection, @Nullable Bundle queryArgs, @Nullable CancellationSignal cancellationSignal) { IContentProvider unstableProvider = acquireUnstableProvider(uri); }
在query方法里,先通过acquireUnstableProvider获取ContentProvider
1
2
3
4
5
6
7
8
9
10
public final IContentProvider acquireUnstableProvider (Uri uri) { if (!SCHEME_CONTENT.equals(uri.getScheme())) { return null ; } String auth = uri.getAuthority(); if (auth != null ) { return acquireUnstableProvider(mContext, uri.getAuthority()); } return null ; }
acquireUnstableProvider会调用它的重载方法acquireUnstableProvider
1
2
3
protected IContentProvider acquireUnstableProvider (Context c, String auth) { return this .mMainThread.acquireProvider(c, ContentProvider.getAuthorityWithoutUserId(auth), this .resolveUserIdFromAuthority(auth), false ); }
acquireUnstableProvider方法会调用ActivityThread的acquireProvider方法
1
2
3
4
5
6
7
8
9
10
11
12
13
14
15
16
17
18
19
20
21
22
23
24
25
26
27
28
29
30
31
public final IContentProvider acquireProvider ( Context c, String auth, int userId, boolean stable) { final IContentProvider provider = acquireExistingProvider(c, auth, userId, stable); if (provider != null ) { return provider; } ContentProviderHolder holder = null ; try { holder = ActivityManager.getService().getContentProvider( getApplicationThread(), auth, userId, stable); } catch (RemoteException ex) { throw ex.rethrowFromSystemServer(); } if (holder == null ) { Slog.e(TAG, "Failed to find provider info for " + auth); return null ; } holder = installProvider(c, holder, holder.info, true , holder.noReleaseNeeded, stable); return holder.provider; }
如果有缓存过ContentProvider,则直接获取返回。如果没有缓存,则通过AMS的getContentProvider方法获取
1
2
3
4
5
6
7
8
9
10
11
12
13
public final ContentProviderHolder getContentProvider ( IApplicationThread caller, String name, int userId, boolean stable) { enforceNotIsolatedCaller("getContentProvider" ); if (caller == null ) { String msg = "null IApplicationThread when getting content provider " + name; Slog.w(TAG, msg); throw new SecurityException (msg); } return getContentProviderImpl(caller, name, null , stable, userId); }
ContentProviderHolder调用getContentProviderImpl方法获取ContentResoverHolder
获取到Provider后,就会调用ContentProvider的query方法,这个方法是我们自定义ContentProvider时需要实现的。代码就切换到了我们定义的ContentProvider。
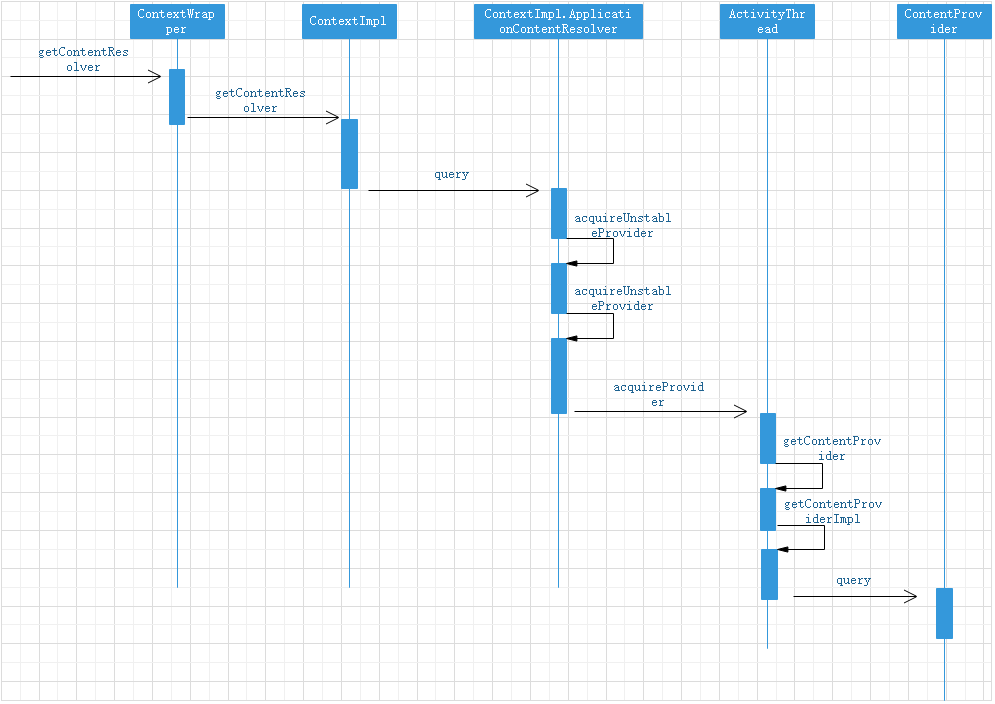
ContentProvider的Query时序图